The thrill of an upcoming adventure is often accompanied by a desire to hold onto every precious moment, every breathtaking vista, every unexpected encounter.
While photographs capture the visual aspects of a journey, a travel journal delves deeper, preserving your thoughts, feelings, and the sensory details that make each trip unique.
Think of it as a tangible keepsake, a personal narrative woven with your own hand. This guide will walk you through the steps of creating a travel journal that you’ll cherish for years to come.
Table of Contents
Step 1: Get Your Notebook and Supplies
The foundation of any great travel journal is, of course, the notebook itself. Consider what qualities are most important to you.
Will it be tossed into a backpack and subjected to the rigors of travel? Then durability and portability are key.
A smaller, lightweight notebook with a sturdy cover might be ideal. Do you envision yourself sketching landscapes and intricate details?
Opt for a notebook with thicker paper that can handle various mediums without bleeding.
Here is how to choose the perfect notebook for your travel journal
Beyond the notebook, gather your essential supplies. A reliable pen that writes smoothly is crucial.
Consider bringing a few different colored pens for adding visual interest. If you plan on incorporating artwork, pack a small set of colored pencils or watercolor pens.
Don’t forget adhesive – double-sided tape or a glue stick – for attaching ticket stubs, postcards, and other ephemera you collect along the way.
Washi tape, with its myriad of colors and patterns, can add a decorative touch without adding bulk.
Here is how to choose what travel journal supplies to carry
Also Read: First Page of Travel Journal: Creative Ideas to Begin Your Journey 2025
Step 2: Is Your Goal to Keep a Diary or a Bujo?
Before you even think about your destination, take a moment to consider the purpose of your travel journal.
Are you aiming for a traditional diary-style account, focusing primarily on daily experiences and reflections?
Or are you leaning towards a bullet journal (bujo) approach, incorporating lists, trackers, and more structured layouts?
A diary-style journal allows for more free-flowing narrative. You might dedicate pages to specific days, recounting events, thoughts, and feelings in a more descriptive manner.
This style is excellent for capturing the emotional arc of your trip.
A bullet journal-inspired travel journal offers more flexibility in terms of organization.
You can still include diary entries, but you can also dedicate pages to specific categories like restaurants you loved, memorable quotes, or a list of souvenirs you want to acquire.
This approach is fantastic for those who enjoy structure and want to actively track different aspects of their journey.
Perhaps you envision a hybrid approach, blending narrative entries with lists and visual elements. Understanding your primary goal will help you tailor the content and layout of your journal effectively.
SECTION 1: BEFORE GOING ON THE TRIP
The preparation stage is crucial for setting your travel journal up for success. Taking some time before you depart will make journaling on the road much smoother and more enjoyable.
Step 1: Writing Itinerary
(Whether You Make It on Your Own or You Receive It From Your Organization)
Whether you meticulously planned every detail of your trip or are following a pre-arranged itinerary, transcribing it into your journal is a valuable first step.
This provides a quick reference point during your travels and helps you anticipate what’s coming next.
If you crafted your own itinerary, write down each day’s planned activities, including locations, transportation methods, and any reservations you’ve made.
Include contact information for accommodations or tour operators.
If you received an itinerary from an organization, carefully copy it into your journal. Highlight key timings or locations that are particularly important.
You might even want to leave some space around each day’s entry to jot down quick notes or deviations from the plan as they occur.
Having your itinerary readily available in your journal reduces the need to constantly refer to digital documents.

Step 2: Make a Packing List/ List of Things to Pack
Creating a packing list in your travel journal serves two purposes. Firstly, it’s a practical tool to ensure you don’t forget any essentials.
Secondly, it can become an interesting snapshot of your pre-trip mindset. You might annotate later how you missed something or how useful an item became to you.
Divide your packing list into categories (e.g., clothing, toiletries, electronics, documents). As you pack each item, you can check it off in your journal.
This not only helps with organization but also provides a sense of accomplishment.
As mentioned earlier, you might even add a section for “Things I Wish I Had Brought” after your trip (can use a sticky note for that!), turning it into a learning experience for future adventures.

Step 3: List of Things to Read Up Before Going on the Trip
As someone who pursues history as a profession, I recommend that you try to immerse yourself in the culture and history of your destination before you even arrive.
When you reach there, you get a different feeling- because you have gained a new set of lenses to view your destination.
There are some stories and facts that you know, which now your brain will keep looking for.
Create a list in your journal of books to read, documentaries to watch, or articles to peruse. If not this, then simply list the parameters or sites you would like to read up a little about.
This list can include historical background, local customs, basic phrases in the local language, or information about significant landmarks.
When I was preparing for my trip to Bengaluru-Mysuru, I made research list which looked like this:-

As you read or watch these materials, jot down key takeaways or interesting facts in your journal.
This not only enhances your understanding of your destination but also provides potential fodder for journal entries during your trip.
You might reflect on how your preconceived notions align with your actual experiences.
Step 4: Create Blank Spreads (Washi Tapes, Headings, Boxes, etc.)
Before you embark, dedicate a few pages to creating visually appealing blank spreads. Use washi tape to create borders or sections.
One option is to draw decorative headings for potential themes like “Food Adventures,” “Interesting People I Met,” or “Moments of Wonder.”
But I end up creating empty boxes or frames, where I can write according the the highlights of my day then.
You also stick photos, tickets, or paper momentos in these canvases as per the happenings in your day!
Here are some free printable phrase and box stickers if you’d like to use them for your spreads.
For instance, I made these empty spreads with washi tapes, inserted days and dates, along with some empty box or circle stickers and phrases :-


Preparing these blank canvases beforehand saves you time and effort while you’re on the go.
When you have a spare moment, you can simply fill in the pre-designed spaces with your experiences and collected items.
This also adds a personalized and creative touch to your journal.
Step 5: Create a List of Prompts
Sometimes, when you’re tired after a long day of exploring, the words might not flow easily.
Having a list of prompts in your travel journal can help spark your writing and encourage reflection.
These prompts can be general or specific to travel:
- What was the most surprising thing I saw today?
- How did the local culture differ from what I expected?
- Describe a sensory experience (a smell, a sound, a taste) that stood out.
- What conversation did I have today that resonated with me?
- What challenges did I face today, and how did I overcome them?
- What are three things I’m grateful for today?
- What is one word to describe today? Why?
- What is a funny or memorable interaction I had?
- What new food or drink did I try today? What did it taste like?
- What did I learn about myself today?
Having these prompts readily available can turn a moment of writer’s block into an opportunity for insightful journaling.
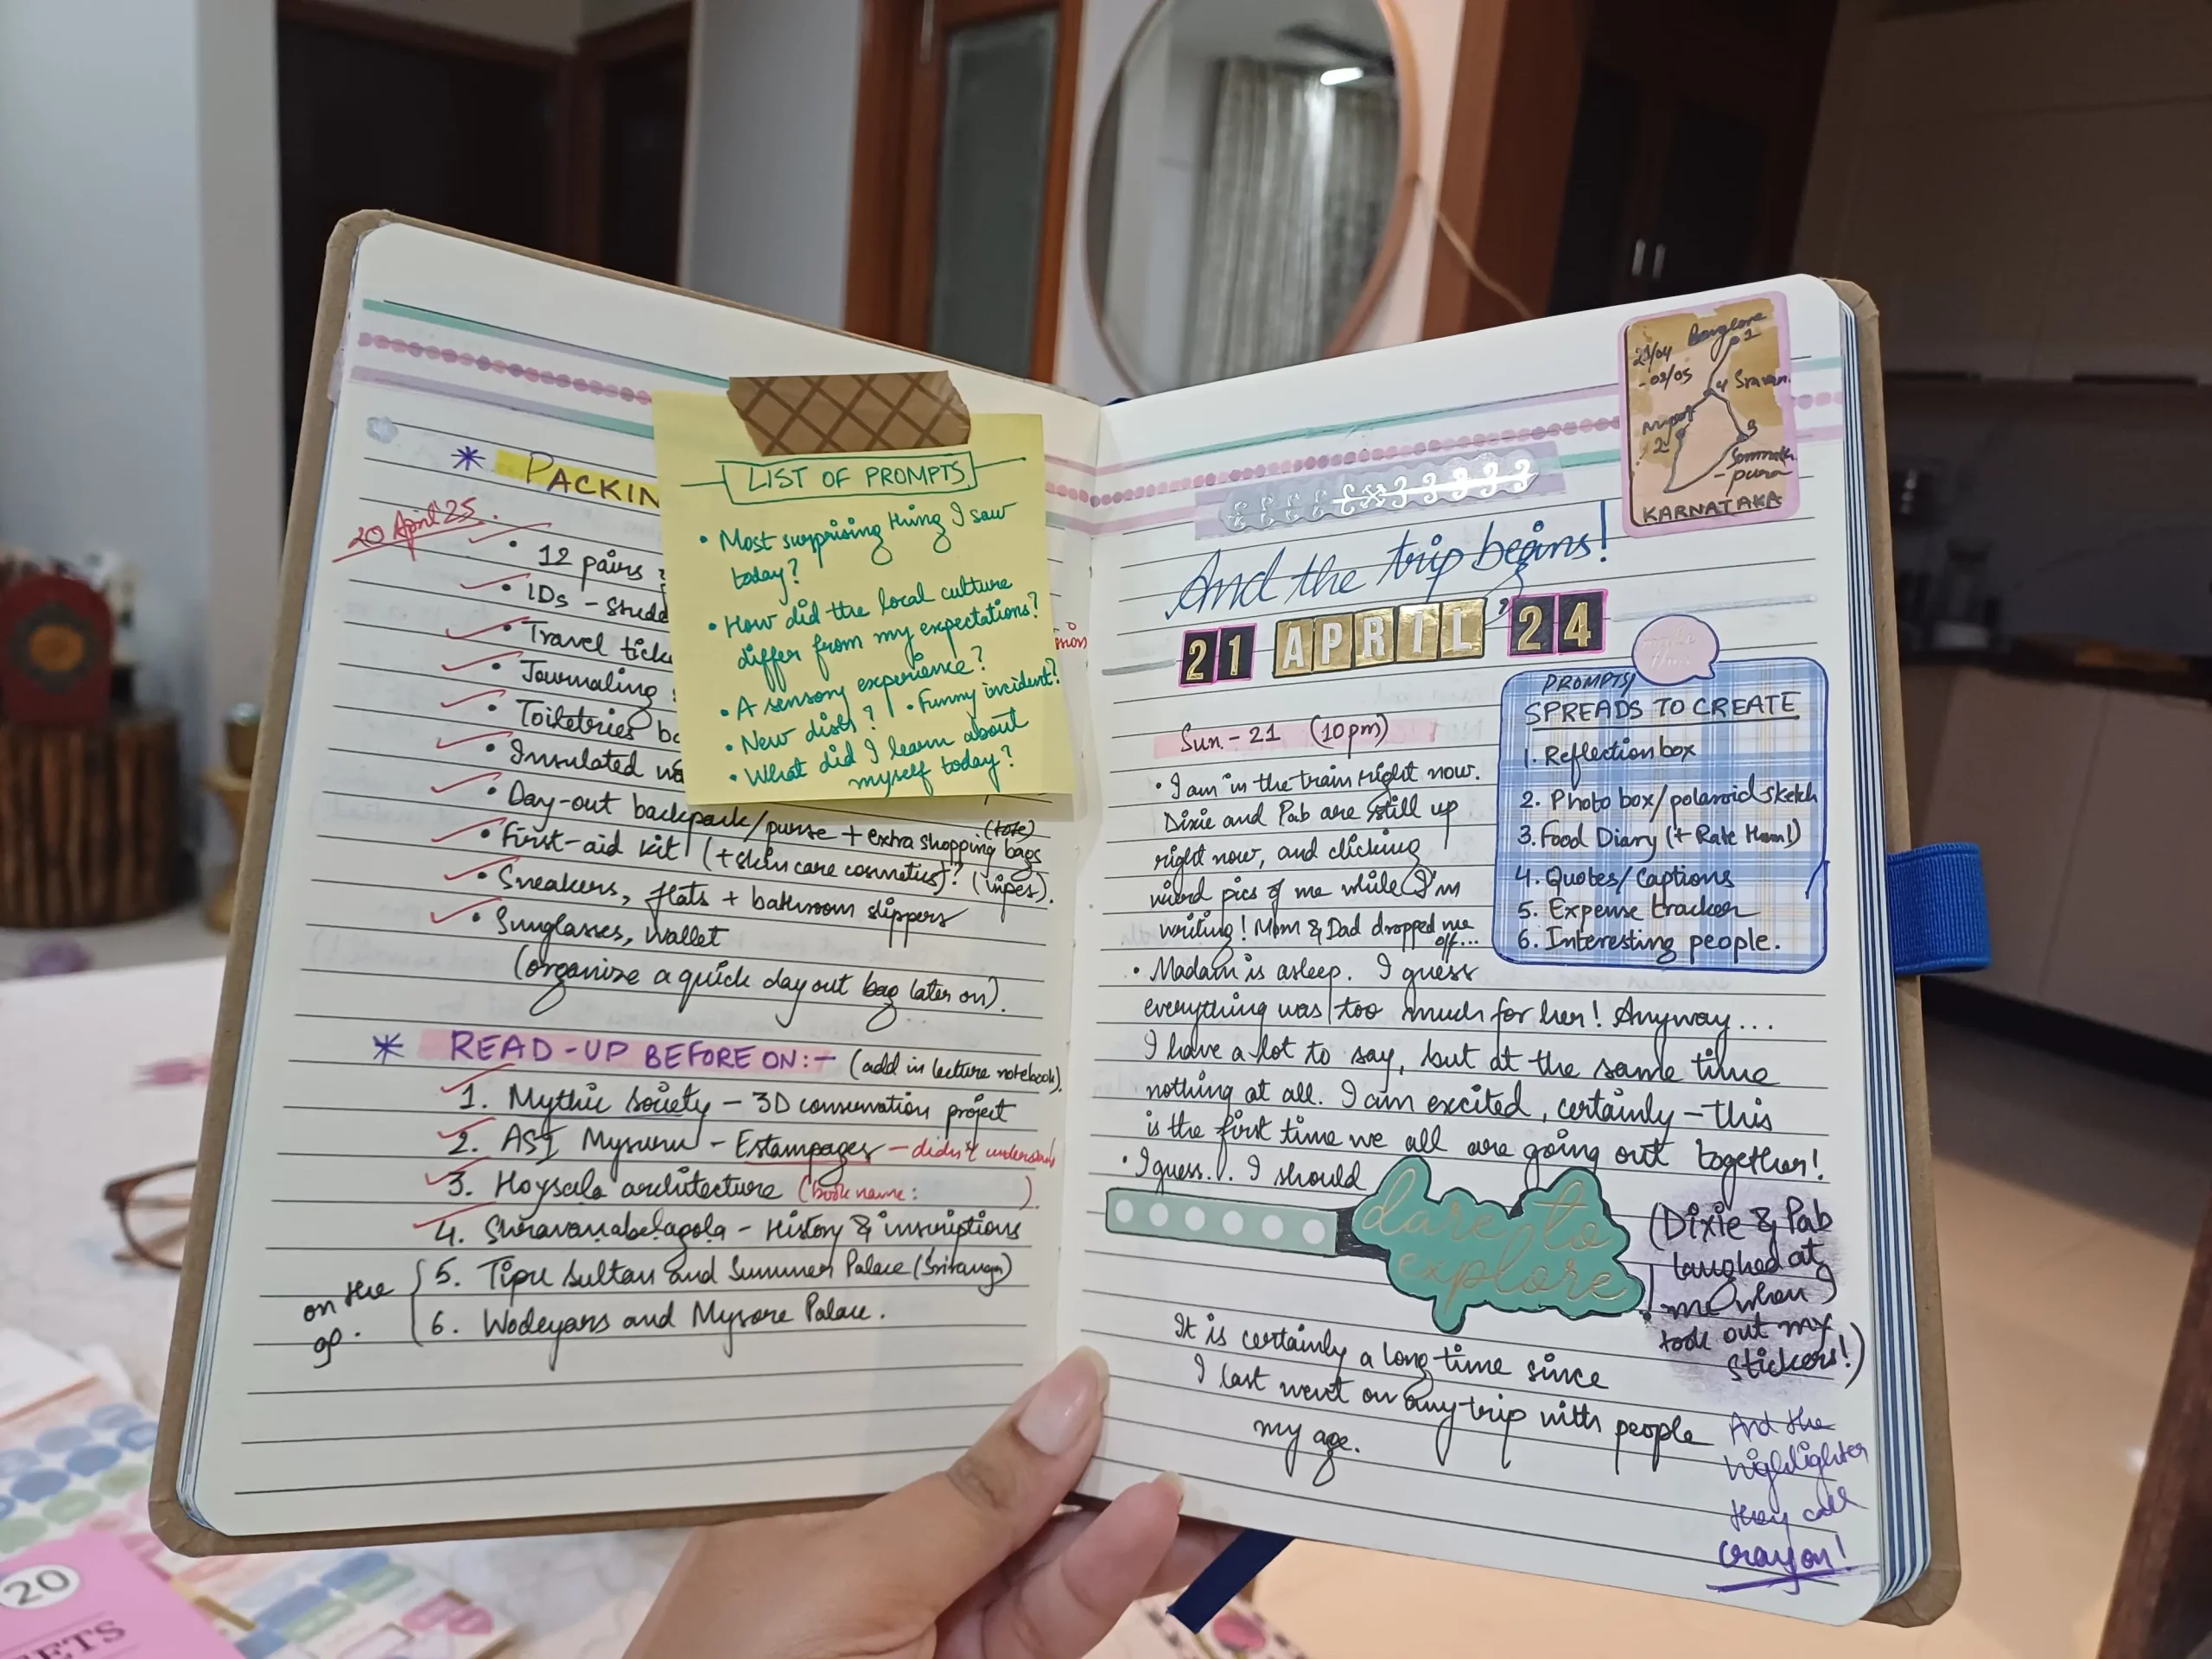
When I was working on my travel journal before I took the trip to Mysuru, I was still new to the concept of maintaining it.
So, I wrote very basic prompts on a sticky note and added it to my spread like this:-

And used a standard yellow sticky note to pen down some interrogative prompts:-

And it all ended up looking like this:-

SECTION 2: JOURNALING WHILE ON THE TRIP
This is where your pre-trip preparation truly comes to life.
With your notebook and supplies at the ready, and your initial groundwork laid, you can now focus on capturing the essence of your journey as it unfolds.
Step 1: Dedicate Time Each Day (Even if it’s Just a Few Minutes)
Consistency is key to creating a comprehensive travel journal. Aim to dedicate some time each day to writing, even if it’s just for 10-15 minutes.
This could be at the end of the day, while waiting for transportation, or during a quiet moment in a café.
Don’t feel pressured to write lengthy entries every day. Some days, a few bullet points or a brief paragraph capturing the highlights might suffice.
The important thing is to establish a routine that works for you and to regularly engage with your journal. These small, consistent efforts will accumulate into a rich tapestry of your travel experiences.
Have a look at this:-

Can you see ..
Step 2: Be Descriptive and Engage Your Senses
Go beyond simply listing what you did. Immerse yourself in the details and try to capture the sensory experience of each moment.
What did the air smell like in the bustling marketplace? What were the sounds of the city at dawn?
How did the cobblestones feel beneath your feet? What were the unique flavors of that local dish?
Use vivid language and descriptive adjectives to paint a picture for your future self (and perhaps others if you choose to share your journal).
Don’t be afraid to include specific details, even seemingly insignificant ones. These are often the memories that become most evocative over time.
When I handled manuscripts for the first time, I ended up recording that sensory moment in my travel journal the same night:-

Step 3: Incorporate Ephemera
Your travel journal is not just a repository for words; it’s also a wonderful place to preserve tangible memories.
Collect small mementos along your journey – ticket stubs, museum brochures, postcards, business cards from interesting shops, pressed flowers, even small snippets of local newspapers or maps.
Use your adhesive to carefully attach these items to the pages of your journal. They add visual interest and serve as powerful triggers for your memories.
You can even write brief captions or annotations around these items to provide context.
Step 4: Don’t Be Afraid to Sketch or Doodle
You don’t need to be a professional artist to incorporate visual elements into your travel journal.
Simple sketches or doodles can capture the essence of a scene or object in a way that words sometimes cannot.
Try sketching a particularly striking building, a delicious meal, a unique mode of transportation, or even just a small detail that caught your eye.
Don’t worry about perfection; the goal is to capture the feeling and memory associated with the subject.
Even simple line drawings can add a personal and artistic touch to your journal.
Since my focus on the trip to Bengaluru-Mysuru was Hoysaḷa inscriptions and architecture, I ended up drawing a very raw sketch of the inscription that I saw there:-

Though nothing compared to the actual inscription, I drew this sketch purely from what my brain registered on the spot there.
That’s what I always mean by ‘observing and recording the places you visit’. Perfection is not the aim- observation, understanding and recording is. This can be best done while you’re still on the trip.
Just for further explanation of my point, here’s a photograph of the actual inscription that I was talking about:-

And this is what I mean by ‘Hoysāḷa architecture is extremely elaborate but at the same time…expressionless’:-

The point that I am trying to make here is that your travel journal can be your way of improving your observation and make you confident enough to note your observations down as well.
Also, you can later reflect upon them. Like I had said earlier, travel journaling is as much about productivity as it is about aesthetics and preserving memories.
Step 5: Embrace Imperfection and Spontaneity
Your travel journal is a personal reflection of your journey, and it doesn’t need to be perfect. Don’t worry about neat handwriting or perfectly structured entries.
Embrace the spontaneity of the moment and allow your thoughts and experiences to flow naturally onto the page.
There might be days when you don’t have much time to write, or when your entry is simply a list of highlights.
That’s perfectly fine. The beauty of a travel journal lies in its authenticity and its ability to capture the true essence of your trip, including the messy and unplanned moments.
While still on the trip, there was a day when I couldn’t write and it ended up looking like this:-

Step 6: Reflect on Your Experiences
Beyond simply recounting events, take some time to reflect on what you’re experiencing.
How are you feeling? What are you learning? What are the moments that are truly resonating with you?
Ask yourself questions and try to delve deeper into your reactions and observations.
This process of reflection can enhance your travel experience and provide valuable insights into yourself and the world around you.
Your travel journal can become a space for personal growth and self-discovery.
SECTION 3: AFTER THE TRIP
Your travel journal’s journey doesn’t end when you return home. It transforms into a cherished keepsake, a tangible record of your adventures.
Step 1: Get the Photographs Printed!!
Once you’re back home and the whirlwind of the trip starts settling down, take a quiet moment to go through the photographs you clicked.
These snapshots are not just pictures—they’re frozen memories, glimpses of places you saw, people you met, and moments that made you smile.
Don’t just leave them buried in your phone gallery or cloud storage. Select the ones that truly feel like the journey—maybe that photo of the mist-covered mountains, a candid laugh shared with a friend, or a quirky café you stumbled upon.
Then, get them printed! Whether you choose glossy or matte, Polaroid-style prints or a photo strip layout, having tangible photos brings an entirely different level of connection to your travel journal spreads.
Turn them into little pockets of nostalgia by adding a caption or doodle next to them. Also, note that at first your post-travel journal page might look like this :-

(These pictures have been taken from the public domain to retain the privacy of the author and her circle.)
But eventually, when you work upon pasting photographs, decorating your spread with stickers and washi tapes, and writing captions—you’ll realize something beautiful is unfolding. It would start looking something like this :-

It becomes more than a craft project—it becomes reflection. A space where you start noticing the little things you might’ve missed in the moment. That’s the magic of this step: it slows you down, helps you treasure the details, and transforms your travel journal from a collection of facts into a tapestry of feelings.
Step 2: Review Your Travel Journal
Take some time to review your travel journal. You might want to add any final thoughts or reflections that have emerged since your return. Perhaps you’ve developed a new perspective or have a clearer understanding of certain experiences.
One of the most fun things I find to do after the trip is annotate my travel journal. As in, I go back to my itinerary, packing lists, things that I wrote, photographs, ticket stubs etc. and take a contrasting colored pen to write down thoughts or anecdotes coming to my mind! Most of the time they are one-liners; either complementary or sarcastic.
This annotation is what made my pre-trip travel journal pages look like this:-

Before annotation, it had looked as follows:-

Another idea- you can add a title page with the dates and destination of your trip. Consider creating an index if your journal is particularly long or if you want to easily locate specific entries in the future.
Step 3: Preserve and Protect Your Journal
Your travel journal is a valuable memento, so take steps to preserve it. Store it in a safe place away from direct sunlight and moisture. If you’ve used delicate ephemera, consider placing acid-free paper between the pages for added protection.
Over time, your travel journal will become a treasured possession, a window back to the sights, sounds, and emotions of your incredible journey.
Also Read:
- Creative Travel Journal Ideas to Capture Your Adventures 2025
- What to Include in a Travel Journal: 15+ Meaningful Ideas 2025
- How to Keep a Travel Journal: A Simple Guide for Beginners
- Your Trip in Your Pocket: How to Keep an Online Travel Journal on Your Phone
- Bucket List Travel Journal: Plan & Track Your Dream Adventures
- Journal Entry for Travelling Expenses | Simple & Professional Examples
- Road Trip Travel Journal: How to Document Your Adventures Creatively
- How Big Is a Travel Journal?
To sum up
1. Start with a Purpose: Decide—will this be a diary of emotions, a structured bullet journal, or a creative blend of both?
2. Lay the Groundwork Before You Go: Create your base spreads with washi tapes, frames, and stickers. Add trip-specific headings like Itinerary, Packing List, Things to Research, and Prompts to Write From.
3. Document While You Travel: Write every day, even if it’s just a sentence. Paste receipts, sketch what you see, and use sensory descriptions to relive the moment.
4. Collect and Attach Ephemera: Keep ticket stubs, museum brochures, pressed leaves, or coffee shop business cards. Stick them alongside your writing to build a multi-sensory page.
5. Use Prompts: Add a prompt page / sticky notes before you travel. It’ll help you write when you’re too tired to think or when the day has just been too full.
6. Get Your Photographs Printed After the Trip: Select meaningful photos and paste on fresh pages in your journal or beside existing entries. Add captions or mini anecdotes to bring the visuals alive.
7. Reflect, Annotate, and Add Final Touches: Once home, flip through your journal. Add sarcastic notes, emotional takeaways, or doodles in contrasting ink. Annotating brings closure—and adds character.
8. Protect and Preserve: Years from now, these pages will still whisper stories of your younger, wide-eyed self.
Here’s a printable checklist for the same.
Happy journaling!