
Last updated on April 25th, 2026 at 10:56 pm
Travel journals are more than just notebooks. They are vessels of memory holding stories of where you’ve been, what you felt, and what stood out to you in moments you want to hold onto forever.
But let’s admit it: a travel journal becomes a lot more engaging when it’s visually expressive. That’s where stickers come in.
In this post, we’ll explore how you can use my custom-designed Travel Journal Printable Stickers, available as a downloadable PDF, to personalize and beautify your travel journals.
Whether you’re printing them at home or heading to a nearby shop, using sticky paper or regular sheets, you’ll find everything you need here.
Table of Contents
Let’s get into the how, the why, and the little aesthetic joys in between.
Why Use Printable Stickers in a Travel Journal?
Stickers add visual rhythm and narrative cues to your journaling spreads.
Printable stickers especially—designed by individuals—carry a distinct charm. They’re versatile, customizable, and can reflect your journaling language.
Here’s what printable stickers can do for your journal:
- Add thematic structure to each page.
- Highlight places, feelings, and key memories.
- Make journaling feel less intimidating and more fun.
- Spark creativity during both the trip and post-trip reflection.
Beyond their aesthetic appeal, stickers offer a unique way to organize and categorize information within your journal.
Imagine quickly scanning a page and immediately grasping the mood of the day, the key attractions visited, or important thoughts, all thanks to a well-placed sticker.
They act as visual anchors, making your journal not just a log, but a vibrant, engaging story.
For those who find blank pages daunting, a few strategically placed stickers can break the ice and encourage you to start writing and creating.
They’re a playfulprompt, inviting you to fill in the gaps and connect the dots of your travel narrative.
Also Read: Travel Journal Format: How to Structure Your Travel Journal
About the Sticker Set: HISTORYWITHDIVYA.in Travel Journal Printables
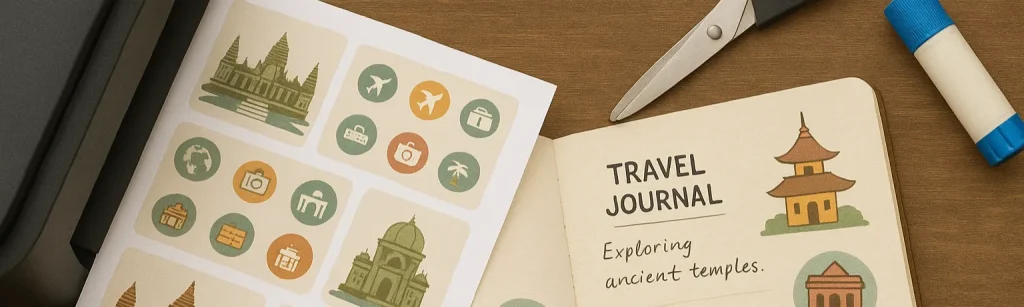
The PDF you’ve downloaded includes a set of travel-inspired printable stickers I designed using Canva.
These aren’t just decorations—they are tools to help you plan, remember, and feel your journey as you put it down on paper. Here’s a peek into what you’ll find:
Themed Categories:
- Days of the Week: Perfect for itinerary spreads or daily logs. You’ll find stickers for “Monday,” “Tuesday,” “Wednesday,” “Thursday,” “Friday,” “Saturday,” and “Sunday,” along with “Weekend” labels. These are invaluable for structuring your entries, whether you’re detailing a single day’s adventures or planning a multi-day excursion.
- Travel Phrases: Expressive words and short statements like “Go Here”, “Come Back Again”, “Visited”, “Adventure”, “Hello!”, “On the Road Again”, “Live Travel Repeat”, “Dream Big”, “Collect Moments and Some Things”, “Making Memories”, “Taking This Trip!”, “Explore More Please”, “Not Old, Vintage”, “Keep Going”, “Wanderlust”, and “YAY!”. These phrases instantly convey mood, highlight important moments, or simply add a touch of personality to your pages.
- Sticky Notes & Thought Bubbles: For mini reflections and quick remarks. The “I Think:” stickers are ideal for jotting down immediate impressions or personal opinions on a place, food, or experience. The sticky notes- inspired “Ideas” stickers provide a flexible space for any additional information you want to include. Other non-text stickers provided in the file are meant for similar uses.
- Flags, Arrows & Indicators: To lead your reader’s eye across your spread, draw attention to key notes, or mark transitions between days. These directional tools are subtly powerful in guiding the narrative flow of your journal.
- To Do” Elements: Essential for planning and checklists. You’ll find “to do” labels, as well as “Don’t Forget” stickers. These are perfect for pre-trip packing lists, daily tasks while traveling, or post-trip follow-ups.
- Itinerary Tabs & Notes Labels: Practical sections to organize your content. The “ITINERARY” stickers are excellent for creating dedicated sections for your travel plans, while “PLAN FOR THE TRIP” stickers serve a similar purpose.
- Roads, Boards & Location Indicators: Use them to highlight each destination you visited, pair them with ticket stubs, or tiny sketches of places. You’ll find country-specific ones like “TOKYO,” “DUBAI,” and “BERLIN”, alongside a generic “PASSPORT” stamp. These add a global flair to your journal entries.
- Other Icons: This is to provide an overall-feature to your travel journal spread.
The blend of visuals and functionality makes these stickers ideal for structured journal users and free spirits alike.
They provide a common visual language across your journal, creating a cohesive and aesthetically pleasing record of your adventures.
How to Print These Stickers – At Home or Outside
You don’t have to own a fancy studio to use printable stickers. You have options! Let’s walk through two primary ways: printing at home or getting it done professionally.
Option 1: Printing at Home
Printing at home is a fantastic option for those who enjoy the DIY process, have immediate access to a printer, or prefer the convenience of printing small batches as needed.
Why Print at Home?
- Instant Gratification: Get your stickers ready in minutes.
- Cost-Effective for Small Runs: No minimum order fees.
- Creative Control: Experiment with different paper types or printer settings on the fly.
- Privacy: No need to share your files with a third party.
What You’ll Need:
- A4-size printable sticker paper (matte or glossy, depending on your preference)
- Matte Sticker Paper: Offers a subtle, non-reflective finish that’s great for a more natural, journaled look. It’s also easier to write on with various pens.
- Glossy Sticker Paper: Provides a vibrant, shiny finish, making colors pop and giving a more “store-bought” sticker feel. Some pens might smudge on glossy paper, so test first.
- OR regular A4 printing paper
- Standard Copy Paper: The most economical option. You’ll need glue or tape to adhere these.
- Cardstock (100-120 GSM): For more durable, rigid stickers that have a substantial feel. Also requires adhesive.
- A working inkjet or laser printer. Ensure your printer has sufficient ink/toner.
- Sharp scissors or a precision craft knife (like an X-Acto knife) and a cutting mat for cleaner edges.
- (Optional) Glue stick, double-sided tape, or washi tape if using regular paper. These provide flexibility and allow you to reposition your “stickers” if needed.
Step-by-Step Guide to Print Travel Journal Stickers
- Download the PDF: Access the “Printable Stickers (Travel) 2025” PDF from my website (HISTORYWITHDIVYA.in). Save it to a convenient location on your computer.
- Open in PDF Viewer: Open the downloaded file using a PDF viewer such as Adobe Reader, Google Chrome’s built-in PDF viewer, or any other compatible software.
- Load Paper: Load your printer with your chosen sticker paper or regular paper. Make sure to load it correctly according to your printer’s instructions (e.g., face up or face down, correct side for printing).
- Access Print Settings: Go to “File” > “Print” in your PDF viewer.
- Crucial Settings:
- Select Printer: Choose your home printer from the dropdown menu.
- Paper Size: Confirm “A4” is selected.
- Scaling/Page Sizing: This is critical. Select “Actual Size,” “100% Scale,” or “Do Not Scale” to ensure the stickers print at their intended size without distortion. Avoid “Fit to Page” or “Shrink to Fit,” as these will alter the dimensions.
- Print Quality: Set the quality to “High Quality” or “Best.” This will use more ink but will result in sharper lines and richer colors for your stickers.
- Color Mode: Ensure “Color” is selected, not grayscale.
- Print & Dry: Click “Print” and allow the sheet to fully print. Once done, let the sheet dry for a few minutes before handling to prevent smudging, especially if you used an inkjet printer or glossy paper.
- Cut & Use: Carefully cut out each sticker using sharp scissors or a precision knife for clean edges. If you’re using regular paper, apply a thin layer of glue, double-sided tape, or decorative washi tape to the back of the cutout before sticking it into your journal.
Option 2: Printing at a Local Print or Stationery Shop
If you don’t have a printer at home, prefer not to use your own ink, or want professional-grade printing, heading to a local print or stationery shop is an excellent alternative.
They often have industrial-grade printers that offer superior quality and a wider range of paper options.
Also Read:
- Travel Journaling Supplies to Carry While on the Go for Your Travel Journal
- Travel Journal for Women: Empower Your Adventures with Reflection & Self-Discovery
Why Print at a Shop?
- Professional Quality: Sharper prints, more accurate colors, and durable results.
- Access to Special Papers: They often stock a wider variety of sticker papers, including waterproof or specialty finishes, and higher GSM paper.
- No Ink/Paper Worries: Leave the supplies and maintenance to the pros.
- Large Quantities: Ideal if you plan to print many sheets for gifts or future use.
What to Do:
- Prepare Your File: Transfer the PDF to a pen drive (USB stick) or send it via email to the local printing store. It’s always a good idea to have both options.
- Communicate Clearly: When you arrive, speak to the staff and clearly explain what you need:
- “I need this PDF printed on A4 sticker paper.” (Most shops will have full-sheet sticker paper).
- “Please print it in full color.”
- “Ensure the print setting is ‘Actual Size’ or ‘100% scale’ – no scaling or ‘fit to page’.”
- You can also request a specific paper weight (GSM) if you want thicker stickers (e.g., 100gsm or 120gsm paper for non-sticker options for better durability).
- Confirm & Collect: Confirm the cost and turnaround time. Once printed, check the quality before leaving.
- Cut and Use: Once you have your professionally printed sheets, you’ll still need to cut out the individual stickers.
Tip: Choose shops that specialize in photo printing, craft printing, or graphic design services—they usually stock a better range of sticker papers and are more accustomed to handling creative projects with precision.
Market Stickers vs. Printable Stickers: What’s the Difference?
You might wonder, “Why go through all this when you can just buy readymade sticker packs?”
It’s a valid question, and the answer lies in personal preference, the tactile experience, and the unique charm of handmade elements.
Here’s my take:
| Feature | Market Stickers | Printable Stickers |
| Pre-cut | Yes, mostly | No, requires manual cutting |
| Custom-designed | Usually mass-produced | Highly personal, often unique to creators |
| Instant Use | Just peel and stick | Needs cutting (and sometimes glue) |
| Affordability | Can be pricey for good quality or unique designs | Cost-effective after initial design and one print |
| Personal Satisfaction | Functional | Emotionally fulfilling, a mindful crafting process |
| Variety | Limited by what’s available in stores | Unlimited, as new designs can be created and printed |
| Reprinting | Need to re-buy the pack | Print as many copies as you need from the PDF |
| Material Choice | Fixed by manufacturer | Choose your own paper type (matte, glossy, regular) |
Honestly? I use both. The market-produced ones are great for quick use when I’m short on time or need a specific type of sticker that isn’t in my printable collection.
But there’s something deeply satisfying about working with printable ones.
When I sit with scissors and cut out each design I chose or created myself, it’s like I’m personally crafting the story that my journal tells. It’s a form of mindfulness. And that means something to me.
The act of cutting, especially with a sharp pair of scissors or a precision knife, can be surprisingly therapeutic.
It forces you to slow down, focus on the details, and engage with your creative process.
This deliberate pace adds a layer of intention to your journaling, transforming it from a simple task into a cherished ritual.
Cutting & Storing Your Stickers
After printing, especially if you’re working with regular paper, cutting neatly is key. Use a pair of sharp scissors or a precision cutter for clean edges. If you’re planning to use them gradually:
- Sharp Tools: Invest in good quality crafting scissors or a precision knife (like an X-Acto knife) with a self-healing cutting mat. This makes the process smoother and results in cleaner cuts.
- Take Your Time: Don’t rush the cutting process. Enjoy the meditative aspect of it.
- Store Smartly:
- Small Zip Pouches: Clear, resealable bags are great for keeping different sticker themes separate.
- Old CD Cases/DVD Cases: These can be repurposed as mini-folders to store sheets or cutouts.
- Mini Folders or Envelopes: Create your own custom folders from cardstock, or use small envelopes.
- Accordion Folders: Small, expandable folders are excellent for organizing multiple sheets.
- Inside Your Journal Pouch: Keep a tiny pouch of your most frequently used cutouts directly inside your journal or its carrying case so you always have some ready while traveling.
How to Use These Stickers Creatively in Your Travel Journal
This is where the fun truly begins! Let’s explore spread ideas and themes you can experiment with using the printable stickers.
The sticker themes in this collection were designed for flexibility across many types of spreads.
- Itinerary Spread
Transform a plain page into a dynamic itinerary.- Use: Day-of-the-week stickers (“Monday,” “Tuesday,” etc.), “Itinerary” tabs, arrows, and flags.
- Style Tip: Combine the day stickers with brief notes or sketches for a bird’s-eye view of your journey. You can map out your activities hour-by-hour or day-by-day. Use arrows to connect sequential events or highlight specific times. For example, a “Monday” sticker followed by a “GO HERE” sticker pointing to your first planned attraction.
- Destination Highlight Spread
Dedicate a page to a specific city, landmark, or memorable location.- Use: Location indicators (like the city names: “TOKYO,” “DUBAI,” “BERLIN” ), “Go Here” phrases, and “Visited” stamps. The “PASSPORT” stamp can also add a nice touch.
- What to Do: Paste a small photo or draw the place. Use the stickers to title and border the memory. You could use a “Visited” sticker over a small sketch of a famous landmark, or a “DUBAI” sticker next to a photograph of the Burj Khalifa.
- Reflections & Reviews
Capture your thoughts, feelings, and candid opinions.- Use: Sticky notes, “I Think” stickers, and thought bubbles.
- Add-on Ideas: Rate the place or food with stars, or write a “Would I return?” note in a flagged section. These stickers are perfect for capturing those fleeting thoughts that often get lost but are crucial to reliving the experience later.
- Adventure Logs
For those thrilling moments and grand explorations.- Use: Phrases like “Adventure”, “Travel”, “Live Travel Repeat”, and “On the road AGAIN”. Arrows pointing to the best parts, and doodles enhanced with stickers.
- Add Texture: Use washi tape and hand-drawn borders along with the printable stickers for a mixed-media effect. A “Keep Going” sticker placed next to a challenging hike entry can be a powerful reminder.
- Café & Chill Days
Document those relaxing moments and local discoveries.- Use: “Coffee”, “Please,” “Come Again” tags, and minimalist notes.
- Creative Touch: You can even press a real coffee cup stain lightly on the page and use stickers around it for an authentic, artistic touch. Add a “ME TIME” sticker next to a sketch of your favorite cafe.
- Start & Finish Spread
Create impactful opening and closing pages for your travel narrative.- Use: Themed headers like “Hello!”, “Come Here Again”, “TRAVEL JOURNAL”, or “NOTES”.
- Application: These help define sections or mark the beginning and end of a trip, providing a satisfying sense of completion. You can also use “PLAN FOR THE TRIP” at the beginning and “UPDATE” or “VISITED” at the end of sections.
- “To Do” and Checklist Spreads
Keep track of tasks, reminders, and activities.- Use: All the “to do” stickers, “Don’t Forget” stickers, and stickers with numerical lists for detailed lists.
- Practical Use: Essential for pre-travel packing lists, daily activity reminders, or even post-trip follow-ups like “send postcards” or “organize photos.”
- Aesthetic Tip: Use on Plain (Unruled) Paper
From experience, I can confidently say—printable stickers look the best on plain, unruled pages.
With no background lines, they blend in effortlessly, giving your journal a clean and professional aesthetic.
If your journal is ruled or grid-based, try adding a neutral-colored sheet or sticker base before pasting to create a clean backdrop for your stickers.
This helps them pop and maintains the visual harmony of your journal.
Also Read:
- How to Keep a Travel Journal: A Simple Guide for Beginners
- Your Trip in Your Pocket: How to Keep an Online Travel Journal on Your Phone
- Bucket List Travel Journal: Plan & Track Your Dream Adventures
- Journal Entry for Travelling Expenses | Simple & Professional Examples
- Road Trip Travel Journal: How to Document Your Adventures Creatively
- First Page of Travel Journal: Creative Ideas to Begin Your Journey 2025
- How Big Is a Travel Journal?
Final Thoughts: Stickers That Tell Your Story
A travel journal is not just a record. It’s a living, breathing scrapbook of your thoughts, sights, and memories.
Printable stickers designed by creators (and even yourself) carry a sense of intimacy that store-bought ones often don’t.
And yes, cutting them out takes time. You might end up with paper shreds on your bed or desk. But the act of cutting and choosing what goes where—it slows you down in the best way.
It makes you feel the memory again, not just record it. This deliberate engagement transforms journaling into a mindful practice.
Each snip of the scissors, each placement of a sticker, becomes a small act of connection to your experiences, solidifying them in your memory and on paper. It’s about savoring the process as much as the outcome.
So whether you print these at home or head to your local shop, whether you’re journaling on a mountain retreat or while stuck at an airport, know that your journal is becoming more you with every sticker you paste.
Ready to Begin?
Download your Travel Journal Printable Stickers from historywithdivya.in and start transforming your travel pages into keepsakes. Let creativity and memory walk hand in hand—one printable sticker at a time.